Are you having issues with your Excel data table? We are here with some solutions that may help you solve your problems. So follow this article to know why your Excel data table is not working, the problems, and their solutions.
📁 Download Excel File
Download the Excel file we used to create this article so you can practice.
Learn What to Do When Excel Data Table Is Not Working with These 6 Issues and Solutions
There may be several reasons why you are having problems with your Excel table. If you can’t tell what’s wrong, read this article to get some idea of the type of problem you are facing and how to get rid of it. For a better understanding, we have used three different datasheets in this article.
In this article, we have illustrated six problems related to Excel data tables.
1. Table Functionality
Data tables in Excel have functionality such as structure references, sort, and filter arrows, formatting, etc. Sometimes it may arise problems for you, and the easy solution to this problem is to get rid of it. Follow the steps below.
⬇️⬇️ STEPS ⬇️⬇️
- Firstly, select the whole table, and from the toolbar, choose the Table Design.
- Secondly, from the group of Tools choose to Convert to Range.
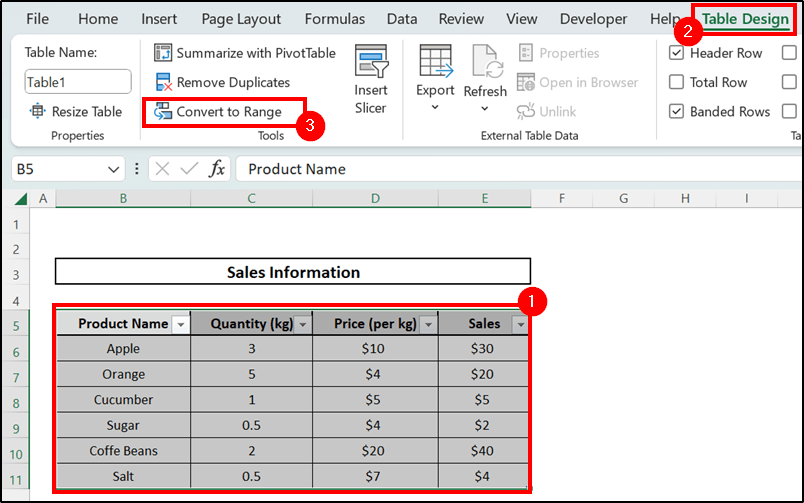
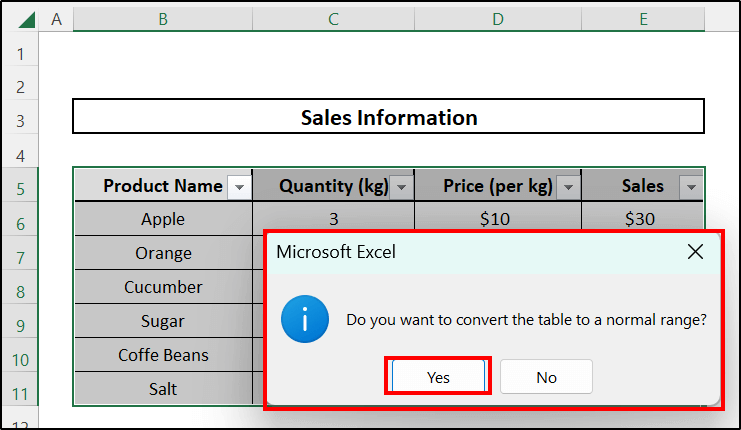
- As a result, a dialogue box will open asking if you want to convert the table to a normal range. Press the Yes option.
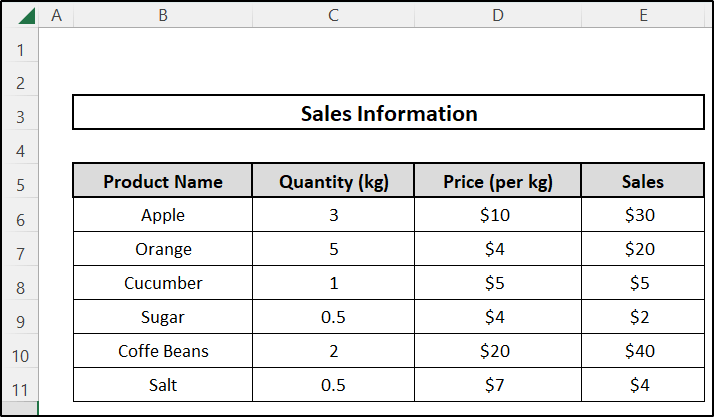
- Then, go to the table and observe that it has converted from table to range and the format is unchanged.
2. AutoCorrect Settings
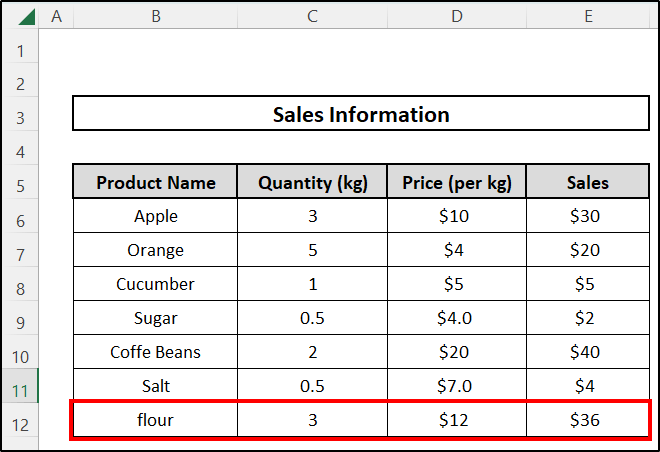
Tables in Excel have a feature that enables them to expand automatically. The AutoCorrect feature of Excel enables a table to expand automatically. This is shown below with an illustration. Suppose we are trying to insert extra product information into the existing table.
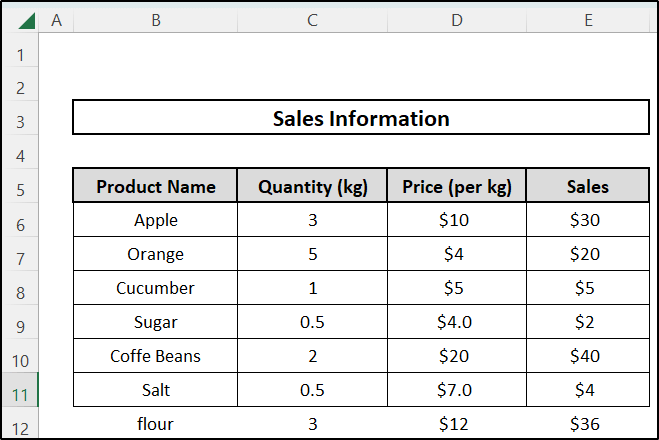
If a table is not expanding automatically, then you should follow the steps below that we are going to discuss.
⬇️⬇️ STEPS ⬇️⬇️
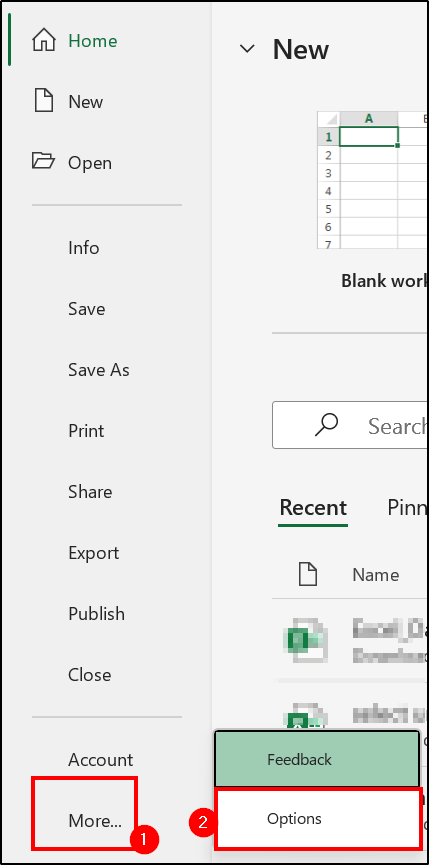
- First of all, we have to check the AutoCorrect So, go to File from the toolbar, then go to the Options, or maybe you can find it by clicking More as shown below.
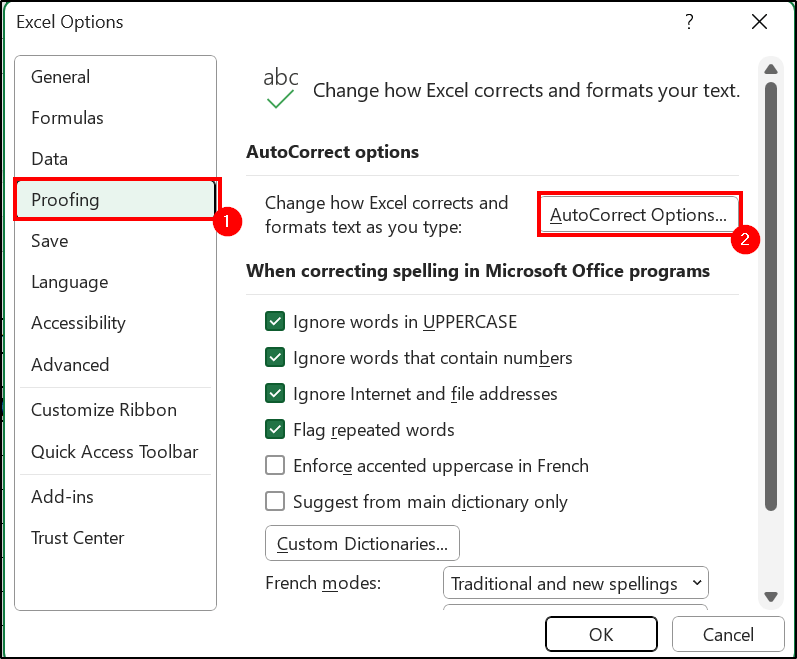
- From there, click on Proofing and then choose AutoCorrect Options.
- After that, a command window will pop up, and from there, go to the Auto Format As You Type option.
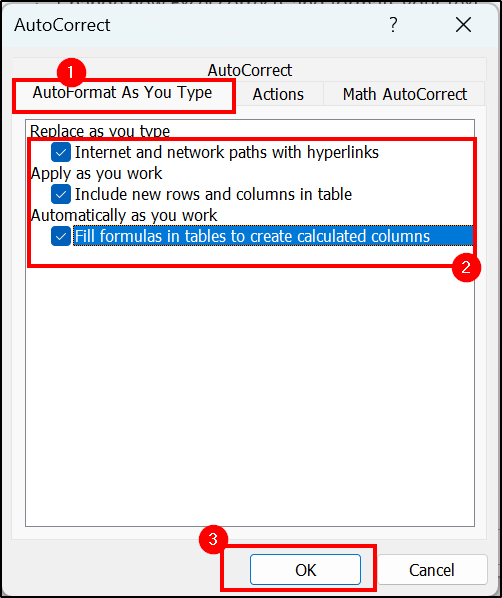
- From there, tick the last two boxes and then click OK.
As a result, you will now be able to expand the table automatically.
3. When Sheet Has Protection
Sometimes your datasheet may enable the Protect Sheet feature. In this case, you must remove this protection to make your table work or change. We have used the same dataset as the previous example. Let’s see how to do this.
⬇️⬇️ STEPS ⬇️⬇️
- To begin, navigate to the toolbar above and select the Review tab.
- After that, from there, you will see that in the group Protect, you will find an option named Unprotect Sheet if this sheet is protected.
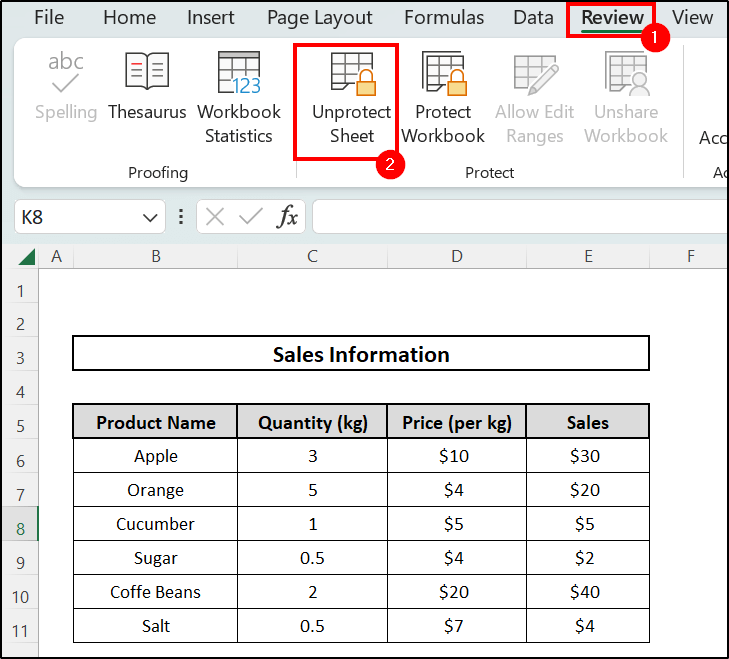
- Finally, click on that option to unprotect the sheet, and you will notice that the sheet is now unprotected, and that’s why the table is now working.
4. When Cells Have Heterogeneous Characters
It is mandatory to have all cells be homogenous in order to make the table work. Heterogenous cells mean that maybe some cells are locked and some are unlocked. If this is the case, the table won’t work. So to get rid of this, follow the steps below.
⬇️⬇️ STEPS ⬇️⬇️
- Firstly, from your keyboard, press Ctrl+1 or right-click on the mouse, and you will find a Format Cells option; click on that.
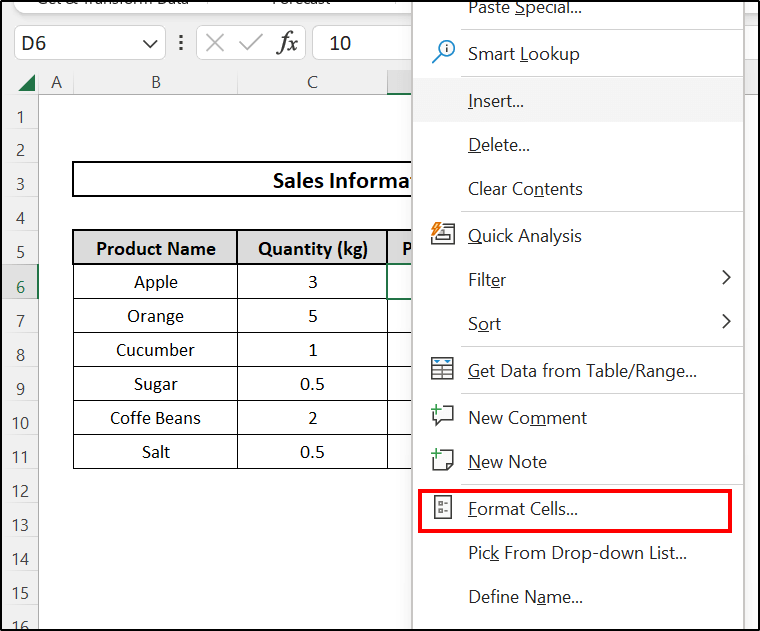
- Due to this, a window named Format Cells will open.
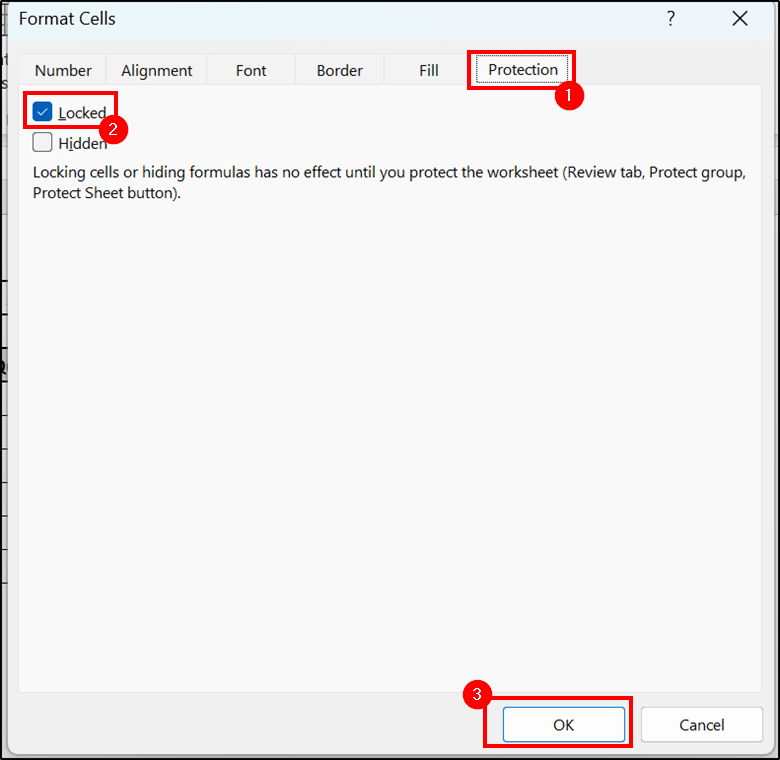
- Then, in that window, go to the Protection option and check the options.
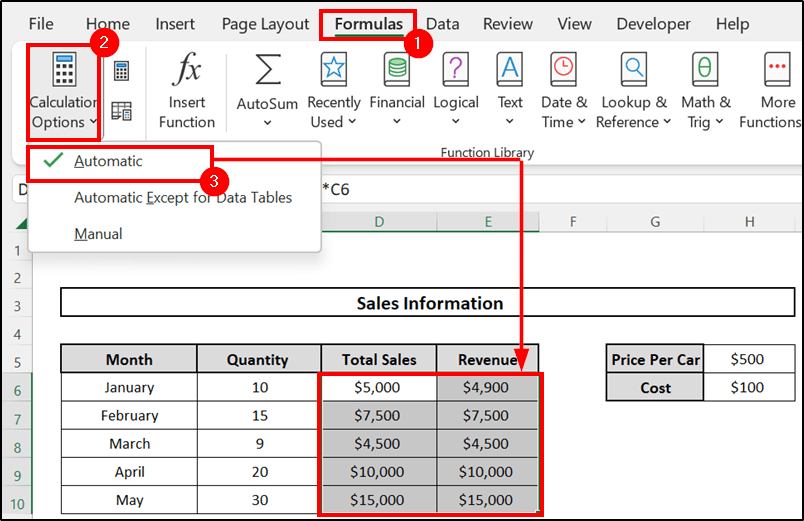
5. Sensitivity Analysis
Sometimes it may be that you have entered the correct value and formula, but there is an issue with the sensitivity analysis due to which the table is not working. Let’s solve this issue by following the below steps:
⬇️⬇️ STEPS ⬇️⬇️
- To begin, select the Calculation Options option from the Formula tab on the toolbar.
- Then, from the drop-down menu, select Manual. This is the cause of your problem. So, click the Automatic option instead of Manual.
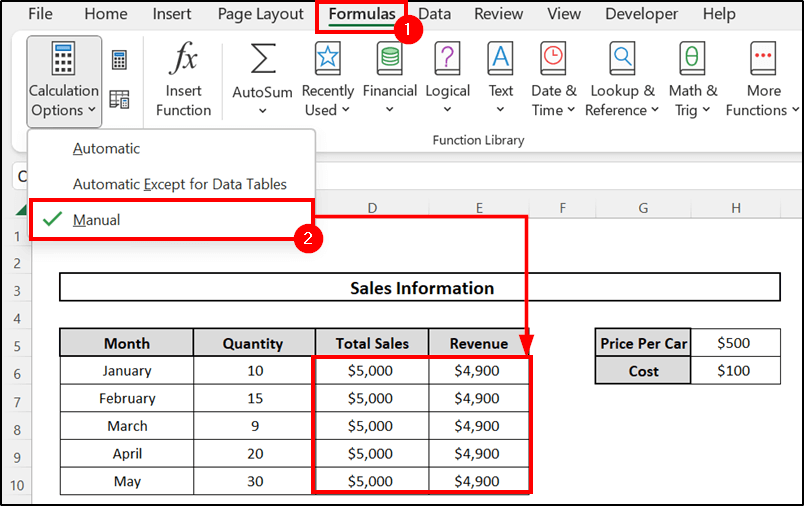
- You will see that all the values in the table have changed immediately.
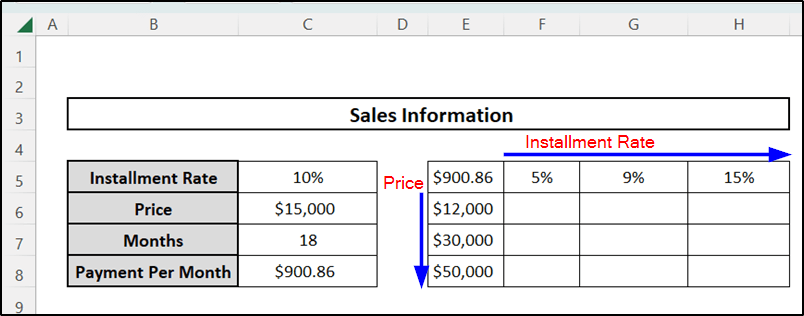
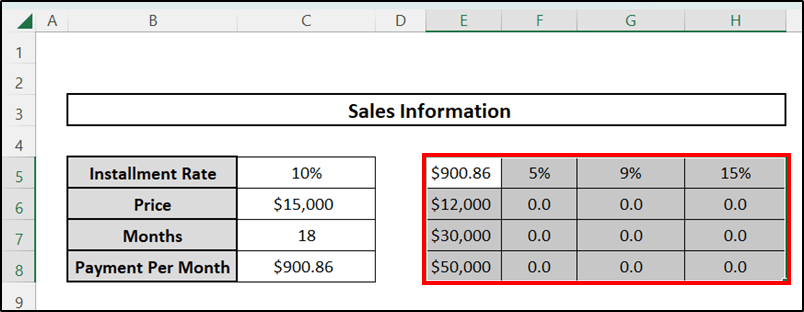
6. Row and Column Wrong Inputs
You may have mistaken the row and column information in your data table. If you are inserting row information instead of column information, it will surely show you the wrong data.
For example, consider the following dataset, where the rows represent the installment rate and the columns contain different product prices. The price per month for different installments will be calculated in the table.
So, check that by following the steps.
⬇️⬇️ STEPS ⬇️⬇️
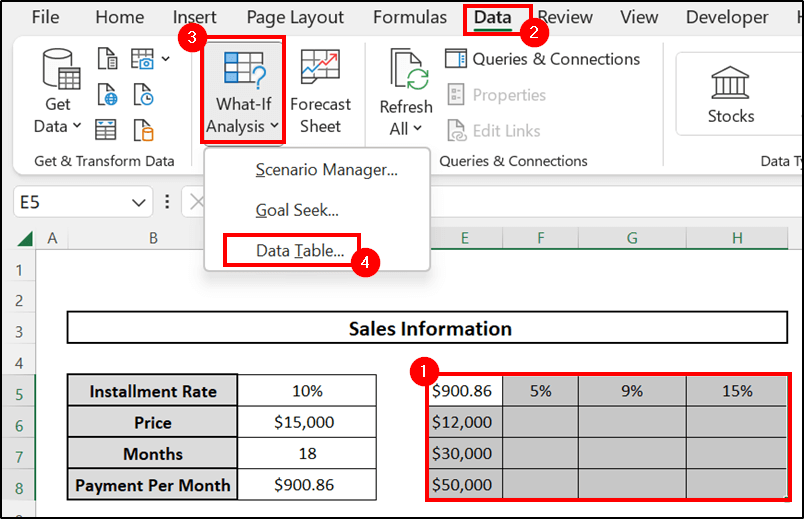
- Firstly, from the toolbar above, choose the Data option.
- Secondly, from the Forecast group, select the What-If analysis option, and from the drop-down menu, choose the Data Table
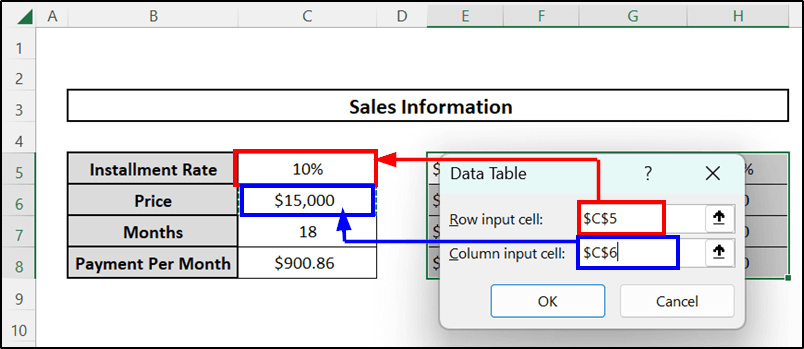
- Thirdly, a dialogue box titled Data Table will appear.
- If you enter the wrong cell into the input boxes, you will get incorrect results. In this dataset, for example, the row input cell is supposed to be C5, but we entered the wrong cell. Same for the column input cell.
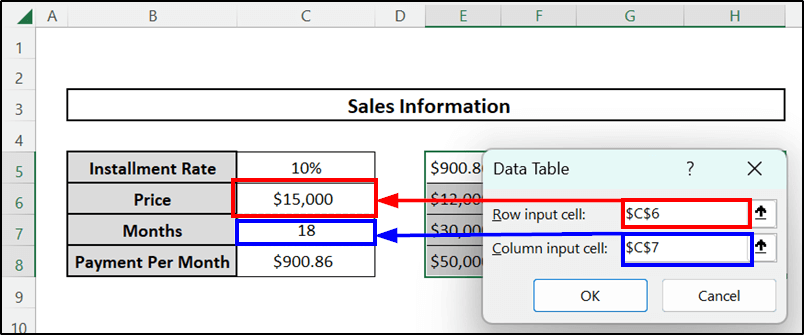
- So, we get the wrong answer in our table, as you can see.
- Finally, in that box with the Row input cell and Column input cell, insert the right cell location for the row input and column input.
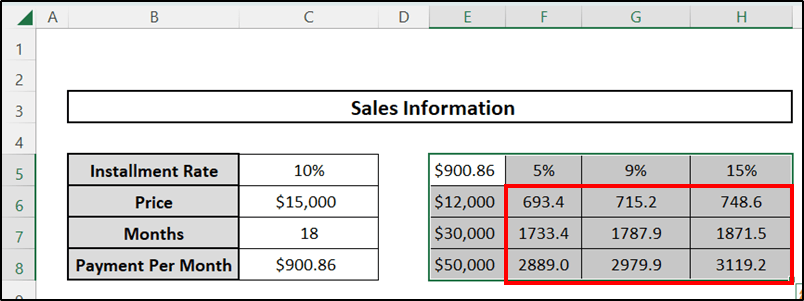
So, notice that we entered the right cells, such as the installment rate cell in the row input cell and price in the column input cell.
- As a result, we got the right answers in our table, as shown below.
📝 Takeaway from This Article
📌 You can find the reasons why the table in your dataset is not working.
📌 You will be able to solve the problem with your Excel table.
Conclusion
Sometimes the problems may be minor, but they can take a lot of your time to solve if you are not aware of what exactly the issue is. Follow this article and try to pinpoint the reason the table is not working. Then solve that problem. Please leave a comment if you have any suggestions or questions. Don’t forget to visit our Excelden page to enhance your Excel-related knowledge.

