Consider a sheet that has some inappropriate or blank values in the Excel sheet. In this case, we must delete multiple columns in Excel. There are several methods to delete multiple columns in Excel. In this article, we are going to demonstrate how to delete multiple columns in Excel.
📁 Download Excel File
To practice please download the Excel file from here:
Learn to Delete Multiple Columns in Excel with These 6 Ways
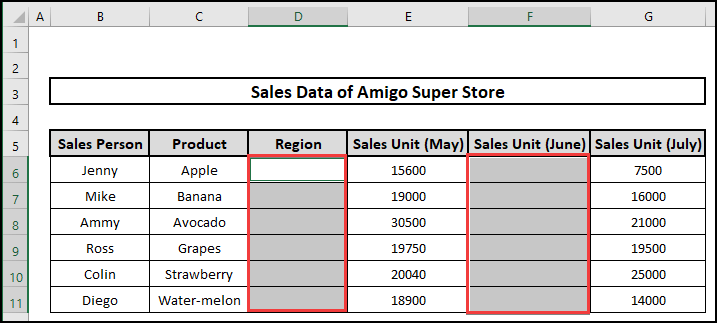
In this article, we will show you 6 approaches to delete multiple columns in Excel. Here we consider a dataset named Sales Data of Amigo Super Store. In the dataset, there is 5 heading containing Sales Person, Product, Sales Unit(May), Sales Unit(June), and Sales Unit(July). There are also 6 columns as well as 11 rows in the dataset.
1. Using Context Menu in Excel
The simplest way to delete columns is to select the column and Right-Click on the mouse to get a context menu and delete simply. Please follow the procedure below.
⬇️⬇️ STEPS ⬇️⬇️
- First, click on columns C and D to select the entire columns.
- Then Right-Click on the Mouse to get a Context Menu.
- Next, from the Context Menu, click on Delete from the list.
- Therefore, those two columns are erased and finally we obtain our output.

📕 Read More: 5 Easy Ways to Delete Infinite Columns in Excel
2. Using Delete Sheet Column Option from Top Ribbon in Excel
From the Tob Ribbon, you can also delete anything you want. Please follow the below procedure.
⬇️⬇️ STEPS ⬇️⬇️
- Initially, Select any cells i.e. C6 and D6.
- Secondly, From the Home menu of the Top Ribbon, Click on Cells.
- Thirdly, Select Delete from the Cells menu.
- Then, select the Delete Sheet Columns option.
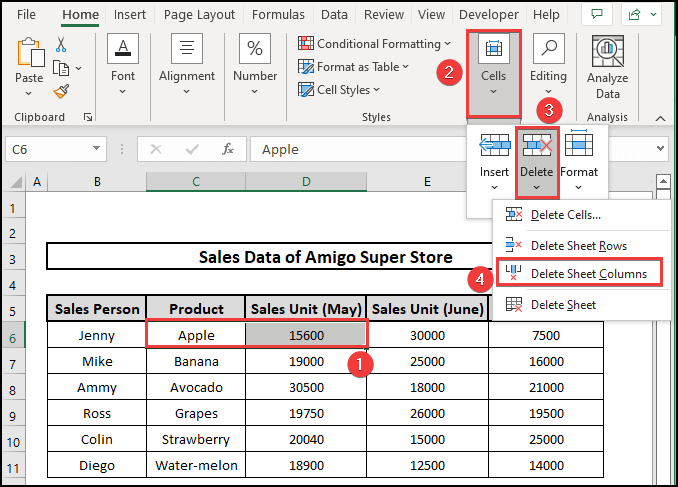
- Finally, those two columns associated with those two cells are erased and finally we obtain our output.

3. Using Keyboard Shortcut
By pressing the keyboard button Delete one can easily erase any columns he wants, Please check out the steps.
⬇️⬇️ STEPS ⬇️⬇️
- Primarily, Select the entire range of data that you want to erase i.e. D5:E11.
- Secondly, Press the Delete button from the Keyboard.
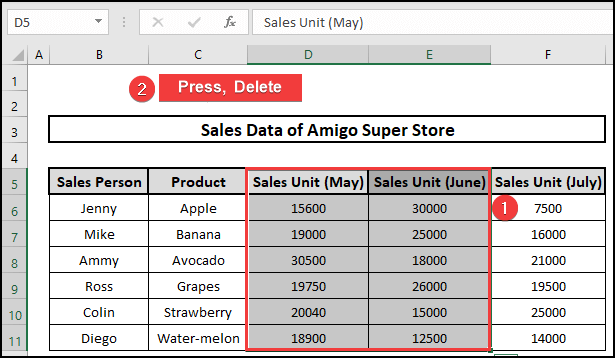
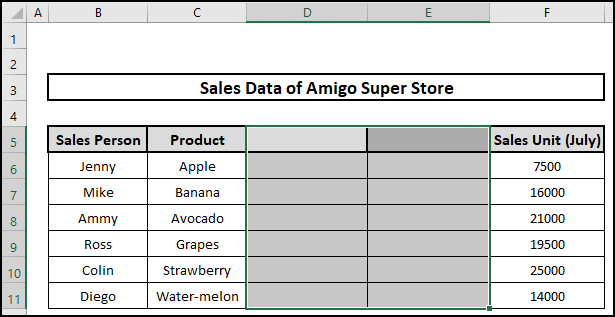
- Lastly, the data of those two columns are erased, and we obtain our output.
4. Using Go to Special Feature to Delete Multiple Rows in Excel with Condition
Suppose you are asked to find out blank data and erase those columns to make the workbook concise. Use of the Find and Select option from the Top Ribbon can be a key. Please follow the necessary steps.
⬇️⬇️ STEPS ⬇️⬇️
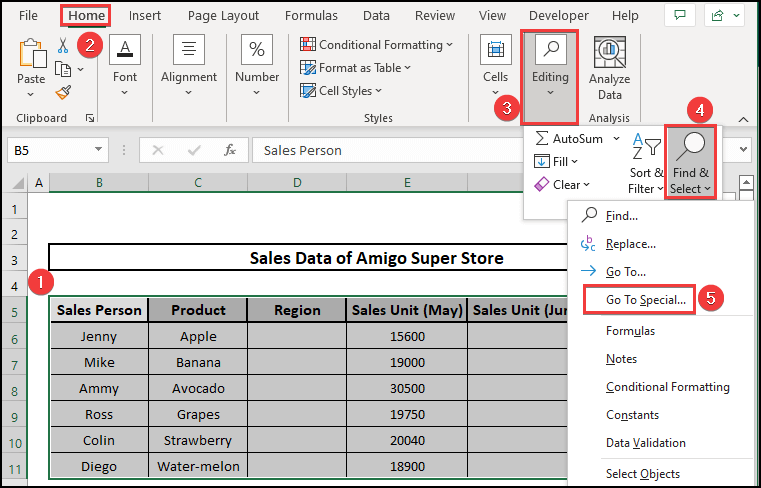
- First, select the entire table.
- Secondly, Click on Editing from the Home menu.
- Then, click on Find and Select feature.
- After that, select Go To Special option.
- Therefore, the Go To Special Box appears.
- Then, Select Blanks from the box and click on the OK button.
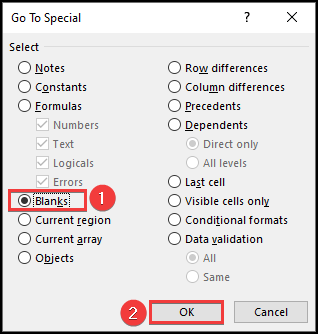
- Therefore, all the blank cells get highlighted.
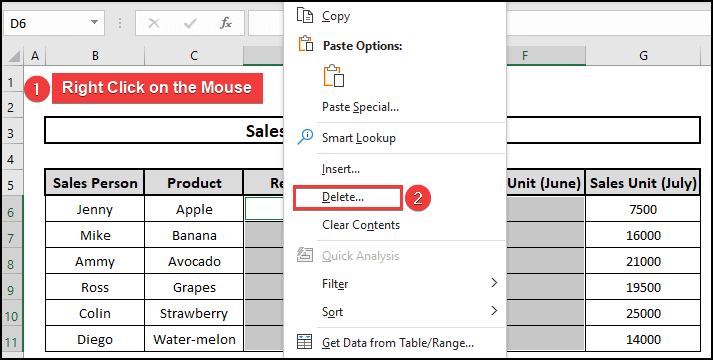
- Now, Right-click on the mouse and get a Context Menu.
- Then, Select the Delete option from the list.
- Thus a Delete box appears.
- After that, select Entire Column and click on the OK button.
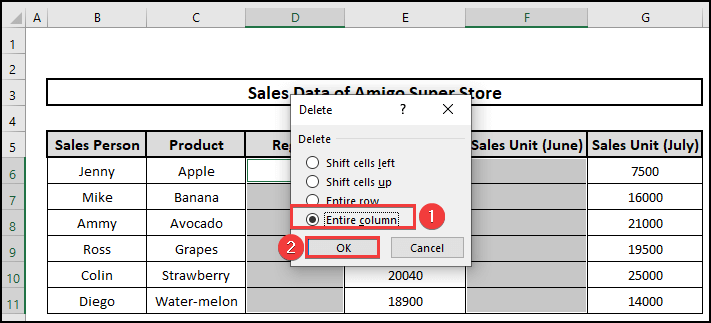
- Finally, we deleted columns containing blank cells and obtain the final output.

5. Delete Multiple Columns Using Formula and Sorting
Using the function COUNTA which counts the values based on the presence of texts with TRUE FALSE. Please check out the necessary steps.
⬇️⬇️ STEPS ⬇️⬇️
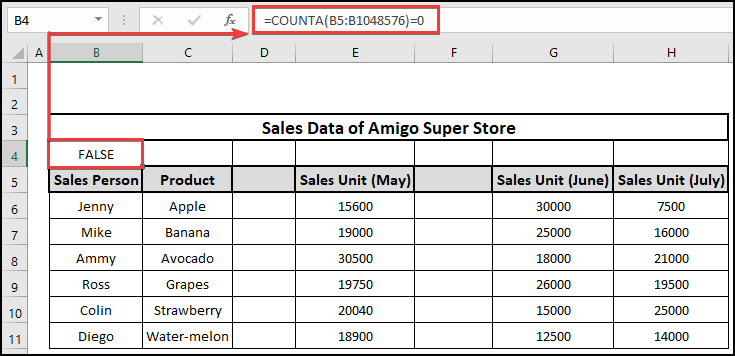
- Firstly, Select a blank cell B6 above the table heading.
- Type the following formula in the B6 cell.
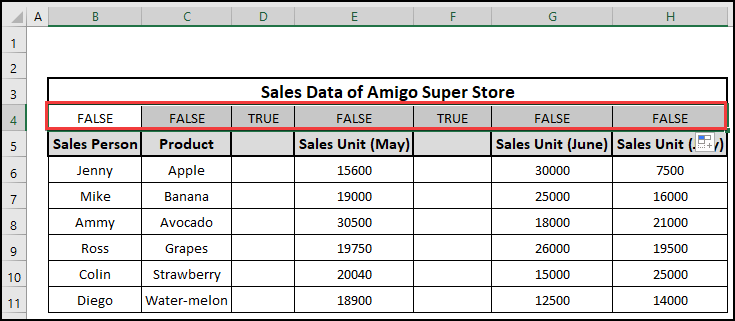
- Using Fill Handle, fill the data with TRUE–FALSE from B4 to H4.
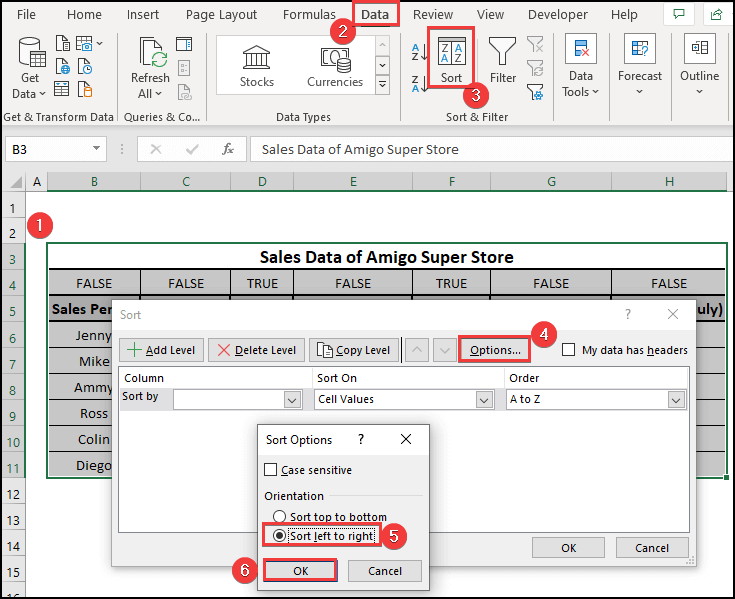
- Now, Select the entire dataset.
- Then click on the Sort option from Data at the Top Ribbon.
- Next, A Sort box will appear.
- After that, click on Options.
- Then, Box named Sort Option.
- After that, select Sort [Left to right] and click on the OK button.
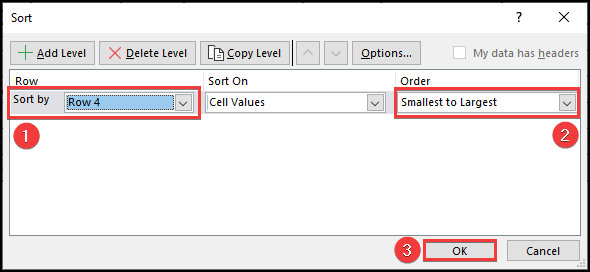
- However, select Row 4 from the Row option of the Sort box.
- And, Smallest to Largest from the Order option and click on the OK button.
- Thus, Two columns containing blank cells take place at the first and second columns.
- Again, by Right-clicking and getting the Context Menu, get the Delete option.
- Then, select the Entire column from the Delete box and click on the OK button.
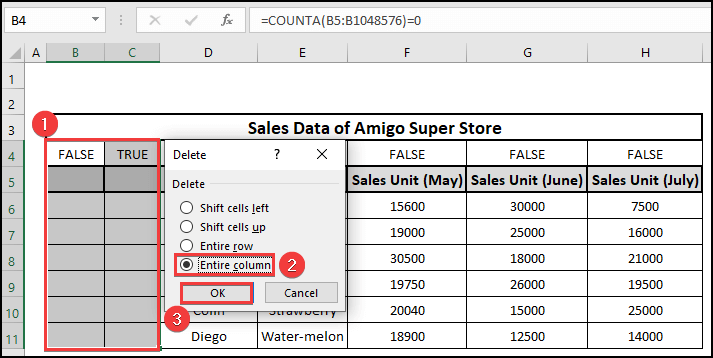
- Therefore, get the final output eliminating blank columns.

📕 Read More: 2 Ways to Delete Column in Excel Without Affecting Formula
6. Delete Multiple Columns Applying VBA Macro
VBA code to delete multiple columns in Excel also can be a way. With the enabling of the Developer option, you can generate a program of your own and delete unwanted columns. Please follow the steps below.
⬇️⬇️ STEPS ⬇️⬇️
- First, Check if your Developer option is available or not.
- Then to enable the Developer option, Right-click on the mouse at the Top Ribbon and select Customize the Ribbon option from the list.

- Click on Developer and click on the OK button.
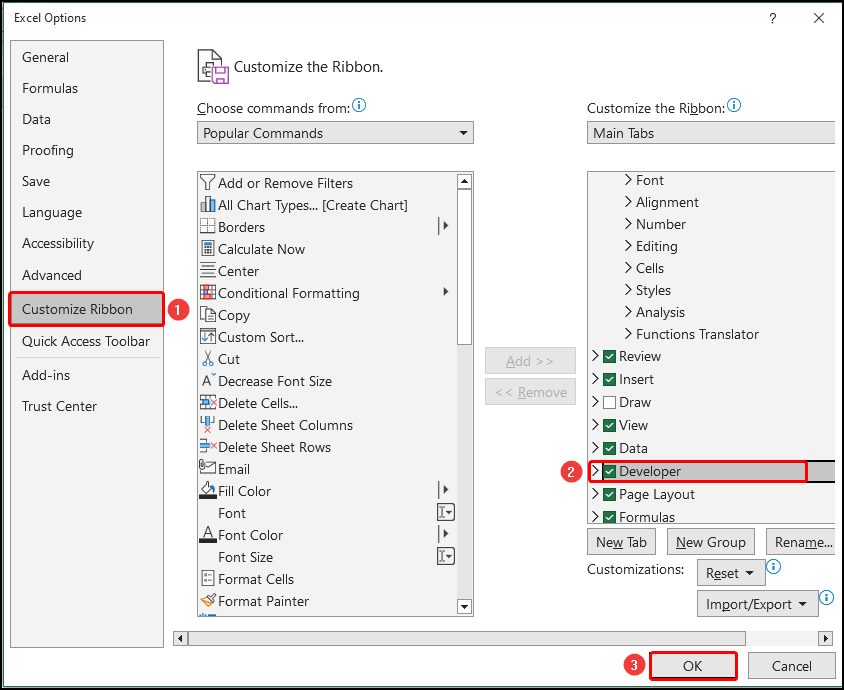
- Now Developer mode is on.
- Next, Click on the Visual Basic option.
- Then, to insert the VBA code, click on Module from the Insert menu.
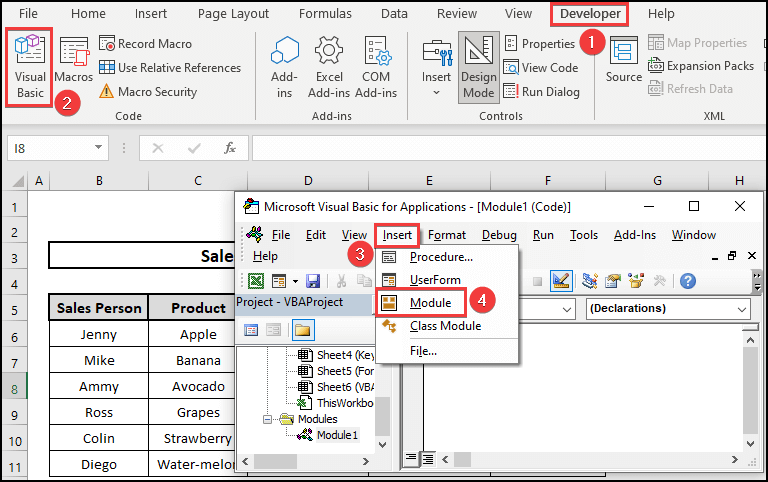
- Insert the following code in the Module and click Run to execute the VBA code.
Code
Sub delete_column()
Columns("D:E").Select
Selection.Delete Shift:=xlToLeft
End Sub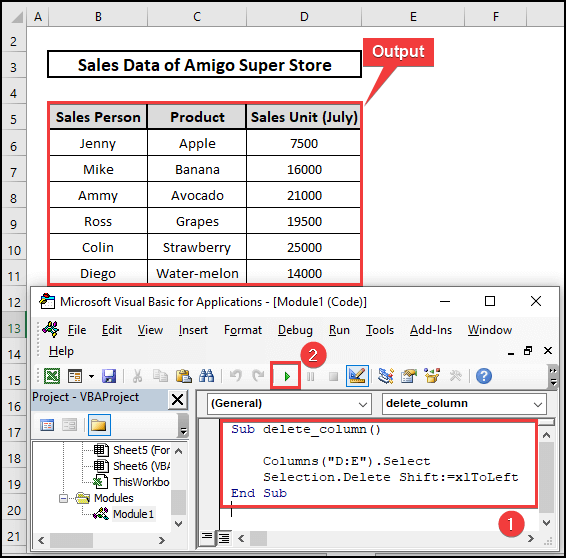
Finally, the two columns D and E got eliminated and we achieved the final results accurately.
📄 Important Notes
🖊️ Be careful and measure range accurately while using the COUNTA function.
🖊️ During working with VBA code, check whether your Developer tool is available.
📝 Takeaway from This Article
📌 In this article, we demonstrated general steps from the context menu, keyboard shortcut, and use of the Delete option from the Top Ribbon to delete multiple columns from a dataset.
📌 COUNTA function to count text’s availability.
📌 Use of Find and Select option to find blank columns and erase them.
📌 VBA to delete multiple columns.
Conclusion
We demonstrated every possible to delete multiple columns in Excel. I hope you enjoyed your learning. Any suggestions as well as queries appreciated. For better understanding and new knowledge don’t forget to visit www.ExcelDen.com.